The Easy Fall DIY Project that will save you hundreds this winter.
By: EFynch.com: Home Improvement; Managed Like a Pro!
It's Fall, nice outside, and we have a DIY Home Project that is:
(1) incredibly easy- 1 to 2 hours
(2) cheap to perform -under $20
(3) can save you a few hundred dollars
(4) you cannot cause any damage if you mess it up?
The task?
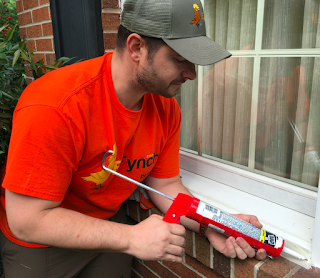
Caulk your windows!
Now, before you scratch your head and hit the "back" button, hear us out.
You walls are hollow. You might have insulation, but there are still plenty of open cavities that are a superhighway for cold air, dust, bugs, pollen, etc. Don't believe us, touch one of your exterior walls on an extremely hot/ cold day and you will realize what we mean, especially around your windows (*technical reasoning below).
Heating your home can account for 40% of your winter energy bill usage. Therefore any amount of cold air that is prevented from coming in, can quickly add up to savings- so this can be a quick and easy task that really pays off.
And Seriously. . . it is a really hard task to mess up!
Materials:
- 1 tube of caulk: Outdoor, weather/mold/UV resistant
- Caulk Gun: (you can buy a "toothpaste" style tube of caulk which does not need a caulk gun. But you will find a caulk gun easier to use).
- Masking Tape: to keep a clean caulk line.
- Knife/ Razor: To cut the end of the caulk tube and to clean old caulk.
- Flat head screwdriver: scraper, caulk removal tool
- Large nail or piece of wire: To puncture caulk tube (there are two seals in a tube)
- Ladder:** If you are going to do higher floors. However, if you don't want to climb a ladder, even doing the first floor will still make a difference.
Caulking Instructions:
1. Inspect windows and doors. If there is caulk already in place, check for deep cracks, brittleness, and missing/ open areas. You want to make sure you have a good seal and "bead" is intact (the line of caulking is called a "bead").

2. Once you've identified areas that need attention, using a caulk scraper, knife, or other sharp and strong tool to gently remove damaged caulk. Be sure to not damage frames. Some reside can be left behind as long as you can completely seal over it. Tougher areas might require extra attention, try using a heat gun or hair dryer. NEVER use any solvents to remove caulk from window/ door frames.
3. After removing old/ damaged caulking, prep the area by wiping down with a mild cleaner or warm water. Make sure all dust and loose debris is removed.
4. Apply making tape approximately 1/2" from seams that you wish to caulk. This will help keep a clean line when you are finished.
5. Apply "bead of caulk" to seams. There is a tool to keep a clean finish but many pros have used a finger for centuries, it is all about your preference. No matter what, keep a clean/ damp rag handy. When applying caulk, it is important to remain consistent and make long, sweeping motions when finishing the bead. DO NOT try to fix a small portion (2"or 3") at a time. Instead, start several inched above any imperfections and run your tool (or finger) over the troubled area and continue several inches below it. Always apply pressure gradually and keep you "smoothing" tool moving while you do (perfect word to describe this is by using a "sweeping" motion).
6. If you mess up--- simply wipe area clean and try again! no harm, no foul. Once you are done, this small task will help keep the cold air outside, and your warm air inside.
Other Useful Homeowner Tidbits:
 |
| DO NOT CAULK WEEP HOLES |
 |
| Exterior walls of a home with proper insulation |
 | |||||||
| Poor insulation, notice how insulation does not touch both walls and might have several air cavities. |
EXPLANATION ON WALL/ AIR MOVEMENT
*Think of insulation as the blanket on top of a fort you built as a kid. If your blanket is large enough to drape over the chairs and reach the floor on all sides, no light can get in. But if the blanket does not reach, you would normally use a few pillows and stuff the areas with whatever you could find to stop the light form coming in.
Kind of the same principal with the insulation and your grownup home. However, in this case, the "light" you wanted to keep out is cold air . . and air is also fluid!
Cold air moves like water and those tiny little holes in the outside of your home allow it to enter into your walls and for a number of difference reasons (air pressure differences in rooms/ outside, and wind), the cold air can be "sucked" into you home, bypassing the insulation.
Insulation slows the thermal exchange from outside temperatures creeping from into your home. They also slow the air flow within your walls however, the more air that can enter your walls, the greater the pressure build up and the less effective your insulation is.
The information below is published by EFynch. EFynch is a Baltimore based home improvement and handyman community providing advice on all matters related to home improvement and helping homeowners connect with, and organize home improvement projects. At not time do we endorse a single provider or service, the information is for conversation purposes and to motivate homeowners to take control of their management and maintenance to increase value and save money.
DISCLAIMER: Do not use a ladder if you are not familiar, and comfortable with the using one. DO NOT perform any project on your home unless you are comfortable in performing such task with, and without the instruction listed above. If you have any concerns, consult a professional. If you think you are about to incur damage, STOP, and consult a professional.
EFynch posts regular tips and tricks for homeowners. We do not perform any physical work on properties. Some of our contributors, members, and employees might perform physical work however they do not with no connection to EFynch and on their own.
If you want any further information, visit our community website- this can be found at our Baltimore Handyman Website.
Not to be confused with Baltimore Handyman :)
Are you a homeseller? Check this Pre-Sale Home Improvement leader. They help you update your home BEFORE putting it on market. They work with your realtor. They do all work with no payments due until closing or settlement (deferred payments). Basically, for no money down, they make unsellable houses a sold home!
One other great fall project is to have your flat screen tv mounted and installed on the wall. If you are in Baltimore, we recommend Baltimore TV Mount. If you are in Prince George’s or Montgomery County, we recommend Maryland TV Mount. These are some of the best tv installers we know of. They use top notch, strong tv mounts, clean up after themselves, and also work with curved tvs.
One other great fall project is to have your flat screen tv mounted and installed on the wall. If you are in Baltimore, we recommend Baltimore TV Mount. If you are in Prince George’s or Montgomery County, we recommend Maryland TV Mount. These are some of the best tv installers we know of. They use top notch, strong tv mounts, clean up after themselves, and also work with curved tvs.


